Getting started
Overview
FAN-C is a Python (3.6+) toolkit for the analysis and visualisation of Hi-C data.
For common tasks, you can use the fanc executable. For more advanced analyses, FAN-C
can be imported as a powerful Python module.
Beyond objects generated within FAN-C, the toolkit is largely compatible with Hi-C files from Cooler and Juicer.
Installation
Before installing FAN-C, make sure you have all the prerequisites installed on your system. Specifically, FAN-C uses the HDF5 file format internally (via PyTables) to handle the large amount of data typically generated in Hi-C experiments. The minimum required version of HDF5 is 1.8.4, which may already be installed on your machine.
Note
It is generally not necessary to install HDF5 manually, as some version will typically be
installed on any current Unix system, including macOS. If you can install FAN-C via pip
(see below) and fanc --version returns a version number, you are most likely good to go.
Prerequisite: HDF5
If you are on Linux, download the source code of the latest version from the HDF5 website and unpack it.
# make a new directory
mkdir hdf5-build
cd hdf5-build
# replace xx with current version number
wget https://support.hdfgroup.org/ftp/HDF5/current/src/hdf5-1.8.xx.tar.gz
# unpack
tar xzf hdf5-1.8.xx.tar.gz
cd hdf5-1.8.xx/
# use --prefix to set the folder in which HDF5 should be installed
# alternatively, you can omit --prefix=... here and run
# sudo make install to install globally (requires admin rights)
./configure --prefix=/path/to/hdf5/dir
make
make install
If you are on OS X or macOS, we highly recommend using the fantastic Homebrew. Then you can simply:
brew install hdf5@1.8
To ensure that PyTables, the Python library that uses HDF5, finds the correct HDF5 version, we need to set an environment variable pointing to the installation directory:
# on Linux, this is the same /path/to/hdf5/dir that you used above
# on macOS, this is wherever brew installs its recipies (typically /usr/local/Cellar)
#   - you can find this by running 'brew info hdf5'
export HDF5_DIR=/path/to/hdf5/dir
FAN-C
We strongly recommend installing FAN-C in a fresh virtual environment to prevent dependency issues. You can do this with tools like pyenv or manually using venv, for example:
# create local virtual environment in current folder
python -m venv ./venv
# activate virtual environment
source venv/bin/activate
The simplest way to install FAN-C is via pip:
pip install fanc
and that should be all you need! If you are not the owner of the Python installation, try:
pip install --user fanc
In some cases when using a virtual environment executables aren’t in the proper PATH,
then you can use
python -m pip install fanc
You can also directly download the FAN-C source code from Github by cloning its repository. The installation is then done via setup.py:
git clone http://www.github.com/vaquerizaslab/fanc
cd fanc
pip install .
FAN-C can now be accessed via command line (fanc for analysis, fancplot for plotting)
or as a Python 3.6+ module (import fanc).
Dev version
If you want the latest improvements, and can live with a higher likelihood of unresolved issues,
you can become a beta tester and check out the dev channel! We would appreciate feedback on
GitHub for any issue that you encounter.
git clone http://www.github.com/vaquerizaslab/fanc
git checkout dev
cd fanc
pip install -e .
Warning
On some systems the installation of FAN-C using the above method will fail with a Cython dependency error. In this case, installing Cython and pysam prior to FAN-C might solve the issue:
pip uninstall fanc
pip uninstall pysam
pip install Cython
pip install pysam
pip install fanc
If you are still experiencing problems during the installation, please raise an issue on GitHub.
Bioconda
Warning
We no longer support installations via conda due to a large amount of dependency
issues - please use a fresh virtual Python environment as detailed above!
An older FAN-C package is also available via Bioconda, but due to an unresolved dependency issue it is currently limited to Python 3.7.X and will not be updated. Please refer to the pull request thread for additional details.
We strongly recommend installing FAN-C via pip - only then you will obtain the latest bug fixes
and features!
Building this documentation
If you want to build this documentation on your local machine, first make sure to install the prerequisites by running
pip install sphinx sphinx_rtd_theme sphinx-argparse
Then navigate to the docsrc folder (assuming you are in the fanc base folder):
cd docsrc
Type make to get a list of possible documentation outputs, for HTML use:
make html
You will find the html output in _build/html.
Example analysis
For this example, we are going to use the command fanc auto (see Generating Hi-C matrices with fanc) to
construct a Hi-C map from a subset of a previously published adrenal tissue data set
(SRR4271982 of GSM2322539).
You can download the files from our Keeper library:
wget -O examples.zip "https://keeper.mpdl.mpg.de/d/147906745b634c779ed3/files/?p=/examples.zip&dl=1"
unzip examples.zip
cd examples
From the examples folder, run:
fanc auto SRR4271982_chr18_19_1.fastq.gzip SRR4271982_chr18_19_2.fastq.gzip output/ \
          -g hg19_chr18_19.fa -i hg19_chr18_19/hg19_chr18_19 -n fanc_example -t 4 -r HindIII \
          --split-ligation-junction -q 30 --run-with test
The --run-with test argument causes fanc to only print the commands it would execute, but
to exit before running any processing steps. Use this to review the pipeline and ensure you chose
the right parameters and that there are no errors.
When you remove the --run-with test argument, fanc will work through the pipeline.
On a modern desktop computer with at least four computing cores the command should take less
than 30 minutes to finish. It will generate several binned, bias-corrected Hi-C matrices from the
FASTQ input.
You can read details about fanc auto and all of its parameters in Generating Hi-C matrices with fanc.
Plotting
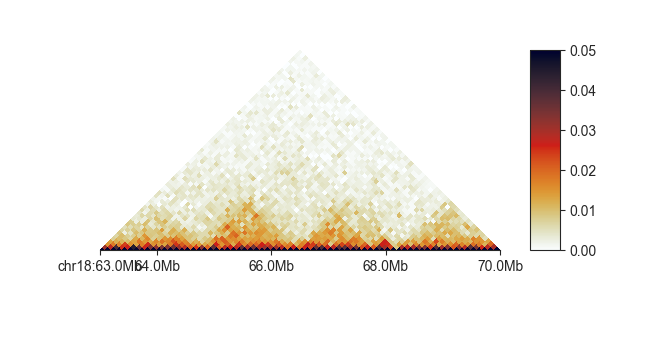
We can plot the newly generated Hi-C maps easily using the fancplot command. Simply execute
fancplot chr18:63mb-70mb -p triangular -vmax 0.05 output/hic/binned/fanc_example_100kb.hic
This will plot the region 63-70Mb of chromosome 18 in the familiar Hi-C plot. Note that this dataset is very small and hence the quality of the matrix not particularly great - but TADs are clearly visible.
You can find details about the plotting executable fancplot in Basic usage.
Next steps
Find out more about fanc auto and its parameters in Generating Hi-C matrices with fanc. If you are interested
in customising individual steps of the pipeline, or in exploring all of FAN-C’s analysis options,
have a look at Individual pipeline steps. For more plotting functions, continue to Basic usage.
To access FAN-C functionality from within Python, check out fanc Python module.